A quick cup of tea while I admire my work, take some pictures, and then dismantle it again to get the frame ready to send off.


 The first side took the better half of Saturday, but I was more than a little chuffed at how it was looking. Not necessarily any lighter but very Mad Max. I decided to call it a day and do the other side on Sunday.
 Sunday morning I return to the shed and mark up the remaining side. With it all pre-marked, and knowing now what I am doing it races along; enough so that my mind starts to wander and I am not really concentrating but thinking about the next job. Two scallops left and..... BOLLOCKS!!! I misread my own marks and sand the wrong bit - right over the spoke hole leaving so little metal that the strength is going to be more than a bit suspect.
 I decide to finish it off anyway and give it a clean and try and figure out if it is repairable with some clever welding. When all was done I was even more mad at myself because it really did look good and painted up it would have looked even better.
  I decide to set it aside and mull over my options and have a beer to refresh my soul and well being. Second beer in and I start to like the looks of that conical hub a little more. After all, it is the better hub and it is a lot cleaner a design. You can also change the sprocket without replacing the whole drum, which I needed to do with the Norton hub, and they don't come cheep. The hub I have on hand has a brand new alloy sprocket and new break shoes - I can fix this up without being anymore out of pocket.
 The first hole went without to much trouble other than a lot of vibration. I started in on the second hole and the chuck on my drill press decided to disintegrate throwing bearing around the shed and leaving the drill inoperative. Just not a good weekend. Refusing to be beaten, I pull out my trusty old hand drill and attack the hub to finish it off.
 After all five holes are drilled, it is time to smooth them out and remove all the sharp edges that will encourage stress fractures to start. A good clean up later and I am pretty pleased with the results and I think it will look good on the bike. I am tempted to scallop this hub too, but after the last unmitigated disaster I am thinking I might just leave it as is.
 The next job is to powdercoat it black and fit gauze in the holes to stop rocks, birds, small children and the like from falling in and jamming the brakes. But that can wait until I am ready to get it laced to a rim.
 And if I change my mind again, it really will make a lovely lampshade.

 Once it was all clean, I attacked it with a fine file over the worst areas, and then 60 grit wet and dry paper attached to a disc on the drill.
 Once I was happy that all the scratches and gouges were smoothed out, it was time for the jar of elbow grease and many grades of wet and dry, right up to 1500 grit. After a fair amount of back and forth between grits (my patience isn't the best) it was time for the buffing wheel and polishing compound.


 It started out as a 1958 Triumph T110 bottom end, complete but in need of a total rebuild. The cases were stripped and bead blasted, with all threads checked and repaired where necessary. A late sixties two piece crankshaft from a TR6C with the lighter flywheel was used, with reground journals to first undersize, polished conrods and all new bearings.
 Later NOS nitrided E3134 camshafts were used with all new bushings, and R cam followers running in Morgo tappet blocks. The cylinder is a Morgo 750cc kit and topped off with an early twin carb 9 stud head.
  The alloy pushrod tubes join the late style blocks to the earlier head, and house lightweight performance pushrods.
 The rocker boxes house lightened dural tappet adjusters and solid spacers instead of the original springs to reduce friction. They are joined by an original finned Webco oil rail.
 Other goodies include a finned sump plate complete with drain plug, timing cover with tachometer drive and oil seal conversion and a Morgo rotary oil pump to keep the whole lot lubricated.
  The magneto is a Lucas Competition model (K2FC) but with all internals removed. They will be replaced with a Boyer electronic ignition unit which will be fitted further down the line.
 Still needed - Oil pressure release valve, intake manifolds, finned rockerbox caps and a dynamo blanking plug to switch to later alternator electrics.
 At the bottom of the garden stands the tool shed. This is by no means a tool shed to boast about. It's roof leaks, the floor is rotten, a family of squirrels takes refuge from the elements inside, and I am forever having to prune back the ivy that seems to like the darkness of the shed.
 Now while it serves its purpose as a place to keep my tools and various projects, it is both a little cramped and a little too damp for restoring old motorcycles. This isn't all bad. I have come to an agreement with the girlfriend that as parts get restored, as long as they don't smell or leak oil, they can live in the warmth and dryness of the house. Sadly the old BSA does not fit into either category so it has to fend for itself in the tool shed. Maybe when I am done with the Triton, the old girl will get an engine overhaul and come stay in the living room. Or maybe we will move to a place with a garage. We will see, but for now, a visual tour...
These actually make it look quite tidy... 
 The Honda Monkey Bike sitting in the corner - I have to finish this by the time my girlfriends nephew has long enough legs to ride it - don't they grow up quickly nowadays.
 Time for a nice cup of tea and a sit down, and ponder the meaning of stuff...
 As for the front, I have been totally clueless and still am. My first thoughts were a full width Norton hub with a Norton Commando twin leading shoe brake plate, but I went off the thoughts of this because the Commando didn't come about until 1968/9 which makes it a little late for my build specs.
 And then I came across a strange company called Disco Volante and discovered what only can be described as cafe racer porn - let me introduce you to the 250 mm Fontana four leading shoe front brake and its little brother, the 210 mm twin leading shoe rear brake. Time to start saving, I think I am in love...
 Well, a lad can dream. Think I will put this decision off for a while, maybe I will make my mind up next year - for now, back to the motor and start on the gearbox...


The motor is currently with Steve Giblin of European Motorcycles (http://www.europeanmotorcycles.com/) who is doing the engine assembly for me, including dynamically balancing the cranks and rebuilding the head, as well as repairing stripped threads from previous heavy handed owners. Hopefully it should be ready in a few weeks time so that I will have something complete to look at and to build a bike around. I am trying not to keep a tally of how much money I have in this motor already, or else this bike is going to end up as living room furniture.
The motor in its original surroundings...
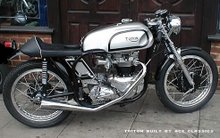
 After a fair amount of searching I came across a 1956 Norton Dominator 99 Featherbed frame - this is the wideline version of Norton's featherbed. It was a complete rolling chassis complete with its Roadholder forks and fullwidth alloy hubs laced to some rusty but original rims. I exchanged it for my tax return and the project begins...
 This is how the frame would have looked in the motorcycle it was intended for...